【Mavem】Maven基础教程
Maven
programmer daily: * writing code * compiling code * testing code * packageing code * deploying code
Automate the task using maven ## What is maven ?
- project management tool for JVM language
- major task
- building source code
- testing
- packageing into JAR WAR or EAR
- generate Java Docs
- manage dependencies
- also called Build Tool or Dependency Management Tool
Install maven
- go to website https://maven.apache.org/download.cgi
- download maven
- set envirnment variable as
M2_HOME- create a new path as
M2_HOME - then, add
%M2_HOME%to path
- create a new path as
- check if
mavenis currently installed - open your terminal and type
mvn --version, you should see the version information
NOTE:
when you use IntelliJ 2022.1 2021.3.2, you may see this error
https://youtrack.jetbrains.com/issue/IDEA-290419
you can try to install apache-maven-3.6.3 instead.
you can find apache-maven-3.6.3 following URL:
https://downloads.apache.org/maven/maven-3/3.6.3/binaries/
Config maven in Intellij
- go to Intellij
setting - search for
maven - go to the
Mavenoption which underBuild Tools - set the
Maven home pathto the directory where you download the zip file. - and toggle the
show setting dialog for new Maven projectoption applyit thenOK
Create your first maven project (using IntelliJ)
- create a new project
- select
maven - give it a name
maven-demo - set the location
- and you can change artifact coordinates
- GroupID
- ArtifactID
- Versoion
- then
finish
Maven folder structure
.
├── maven-demo.iml
├── pom.xml
└── src
    ├── main
    │   ├── java
    │   └── resources
    └── test
        └── java
src: the root directory of application and test unit
main->java: contain the source code of the application
main->resources: contain the static files like xml file csv file, html css file etc
test: unit test and integration tests application
pom.xml contains the metadata of the project dependencies
target not visble in current working directory, but it will contains all the compiled java class
Maven core concepts
- pom.xml
pom.xmlfile stands for “Project Object Model” contains the metadata of the project and manage the dependencies Here is apom.xmlfile look like<?xml version="1.0" encoding="UTF-8"?> <project xmlns="http://maven.apache.org/POM/4.0.0" xmlns:xsi="http://www.w3.org/2001/XMLSchema-instance" xsi:schemaLocation="http://maven.apache.org/POM/4.0.0 http://maven.apache.org/xsd/maven-4.0.0.xsd"> <modelVersion>4.0.0</modelVersion> <groupId>com.clayliu</groupId> <artifactId>maven-demo</artifactId> <version>1.0-SNAPSHOT</version> <properties> <maven.compiler.source>17</maven.compiler.source> <maven.compiler.target>17</maven.compiler.target> </properties> </project>
different types of pom file
* Simple POM
the default pom file
* Super POM
just a large pom file
if you can unzip the file maven-model-builder-3.8.5 first
you can find the Super pom file in the pom-install-directory/lib/maven-model-builder-3.8.5/org/apache/maven/model/pom-4.0.0
* Effective POM
Simple POM + Super POM file
you can see it use mvn help:effective-pom in your project directory
you can also go to the Intellij, right side click the maven icon,
right click your project, and choose Show Effective POM
Dependencies How install dependencies ? step1: write a dependencies tag in your
pom.xmlfile.<dependencies> </dependencies>
step2:go to https://mvnrepository.com/ find the dependency you want to use
click on the spectifc version and copy it to the dependencies tag
Here is use junit as example
   <dependencies>
        <!-- https://mvnrepository.com/artifact/org.junit.jupiter/junit-jupiter-engine -->
        <dependency>
            <groupId>org.junit.jupiter</groupId>
            <artifactId>junit-jupiter-engine</artifactId>
            <version>5.8.2</version>
            <scope>test</scope>
        </dependency>


    </dependencies>
step3:click the maven icon or Sync, and then, the dependency will be automatically download.
And you can click the maven icon on the right side, there will be a dependencies, you can check it out to see if it already downloaded
- Transitive Dependencies
- if you check the
Dependencies - you can see the dependencies’s depenceies
- Over the time, the dependencies will be mess
- if you check the
Eg add another dependency
    <dependencies>
        <!-- https://mvnrepository.com/artifact/org.junit.jupiter/junit-jupiter-engine -->
        <dependency>
            <groupId>org.junit.jupiter</groupId>
            <artifactId>junit-jupiter-engine</artifactId>
            <version>5.8.2</version>
            <scope>test</scope>
        </dependency>
        <!-- https://mvnrepository.com/artifact/org.springframework.boot/spring-boot-starter-test -->
        <dependency>
            <groupId>org.springframework.boot</groupId>
            <artifactId>spring-boot-starter-test</artifactId>
            <version>2.6.7</version>
            <scope>test</scope>
        </dependency>

    </dependencies>
- then take a look at the dependencies,
- you can see there is same dependencies
junit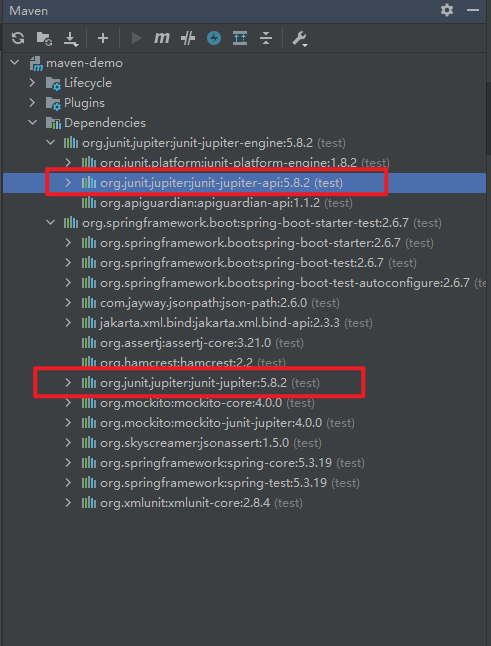
we can set as following, to fix this problem
<dependencies>
    <!-- https://mvnrepository.com/artifact/org.junit.jupiter/junit-jupiter-engine -->
    <dependency>
        <groupId>org.junit.jupiter</groupId>
        <artifactId>junit-jupiter-engine</artifactId>
        <version>5.8.2</version>
        <scope>test</scope>
    </dependency>

    <!-- https://mvnrepository.com/artifact/org.springframework.boot/spring-boot-starter-test -->
    <dependency>
        <groupId>org.springframework.boot</groupId>
        <artifactId>spring-boot-starter-test</artifactId>
        <version>2.6.7</version>
        <scope>test</scope>

<!--            added 'exclusions' tag 'exclusion' tag
            and groupId
            to ensure which one we are using
            and make sure the following are in the  dependency you are using
-->
            <exclusions>
                <exclusion>
                    <groupId>junit</groupId>
                    <artifactId>junit</artifactId>
                </exclusion>
            </exclusions>

    </dependency>
</dependencies>
- SnapShot and Release Dependences
- SnapShot
- created when software is under development
- unstable
- Release
- create after the software is developed and ready to be released
- Stable
Dependency scope
- we can contorl the dependencies’s visblity using dependencies
- There 5 types of scope that maven have
- Complie
- available only at compile time inside classpath
- Provide
- provide by JDK or runtime, available at compile time but not runtime
- Runtime
- available at run time but not compile time
- Test
- available at runnnig and writing tests.
- System
- Path ot the JAR should be provided manually using
<systemPath>
- Path ot the JAR should be provided manually using
- Complie
Repositories
Local repositories
- Folder inside the machine runnnig Maven
<User-Home>/.m2
Remote repositories
- remote website where can download dependencies
Eg. Maven Website Artifactory or nexus
<repositories>
<repository>
    <id>my-internal-site</id>
    <url>http://myserver/repo</url>
</repository>
</repositories>
Build Lifecycle
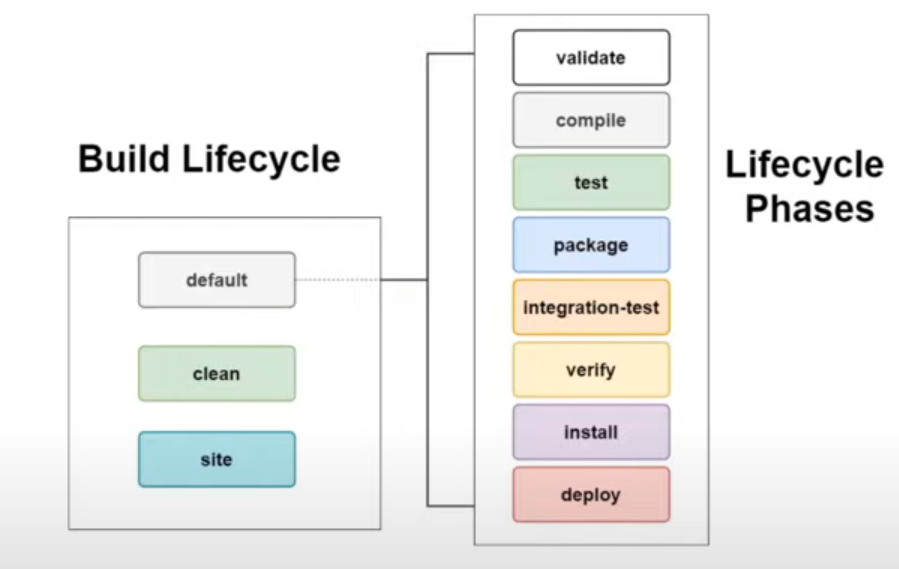
Three steps:
- default
- validate:Verifies
pom.xmlis validate or not - complie: Complie the source code
- Test: Runs the unit tests inside project
- Package: packageing the source code into an Artifact
- Intergrtion-Test: execuse the Intergration Tests
- Install install the created package into our local repository
- Deploy: deploys created package to the remote repository
- validate:Verifies
- clean
maven clean install - site
- default
Plugins and Goals
Plugins enables us to return the lifecycle phases in our Maven Project
Each Plugin is associated with a
GOAL, which is linked to the lifecycle phase(ex:complie)Plugins can be defined inside
<plugin>section, under<bulid>tagMaven Complie Plugin
- complie our java files, similar to running
javac <java-class-name> we can add plugins as following, we are using
maven-compiler-pluginhere<build> <plugins> <plugin> <groupId>org.apache.maven.plugins</groupId> <artifactId>maven-compiler-plugin</artifactId> <version>3.10.1</version> </plugin> </plugins> </build>we can added a class and
maven-compiler-pluginwill complie it and put it intargetfoldercommand
mvn compiler:compile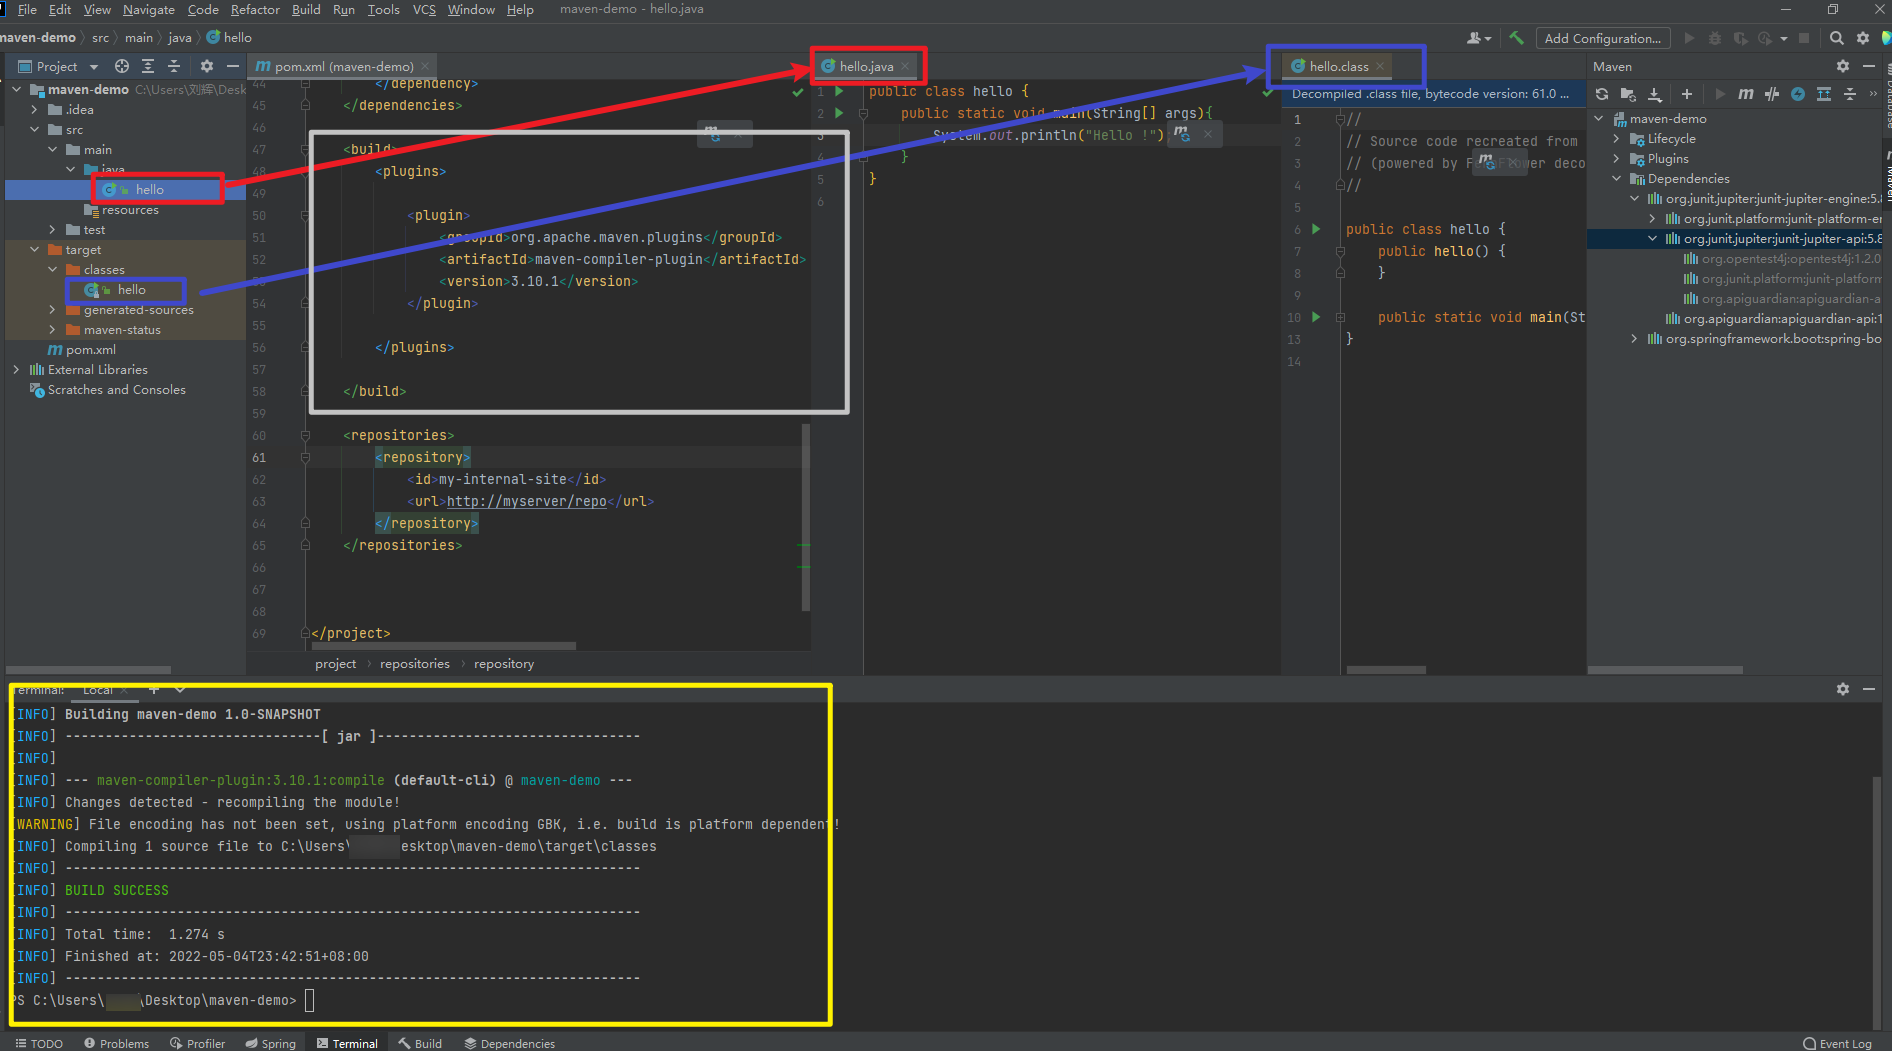
- complie our java files, similar to running
we can also test it using
mvn compiler:testCompile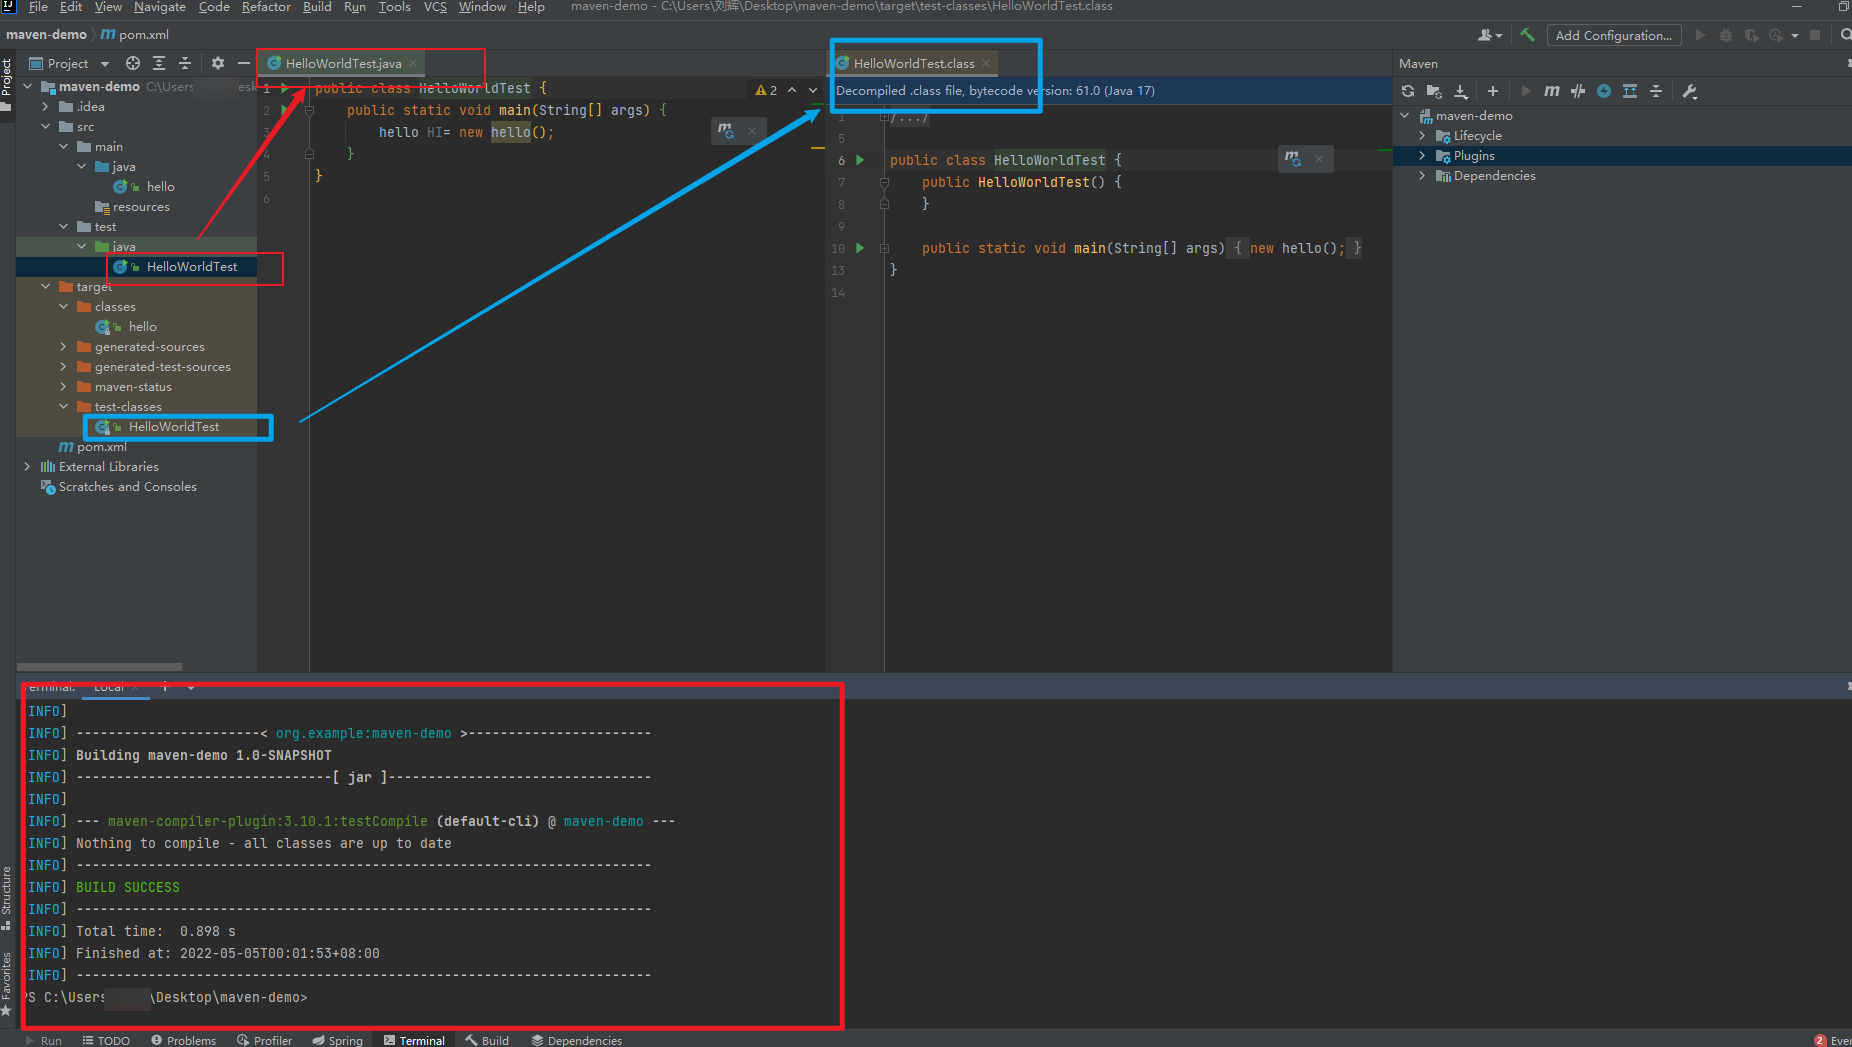
- and you can also use
maven-compiler-pluginon the right side But it will failed, because the default version JDK in IntelliJ is1.7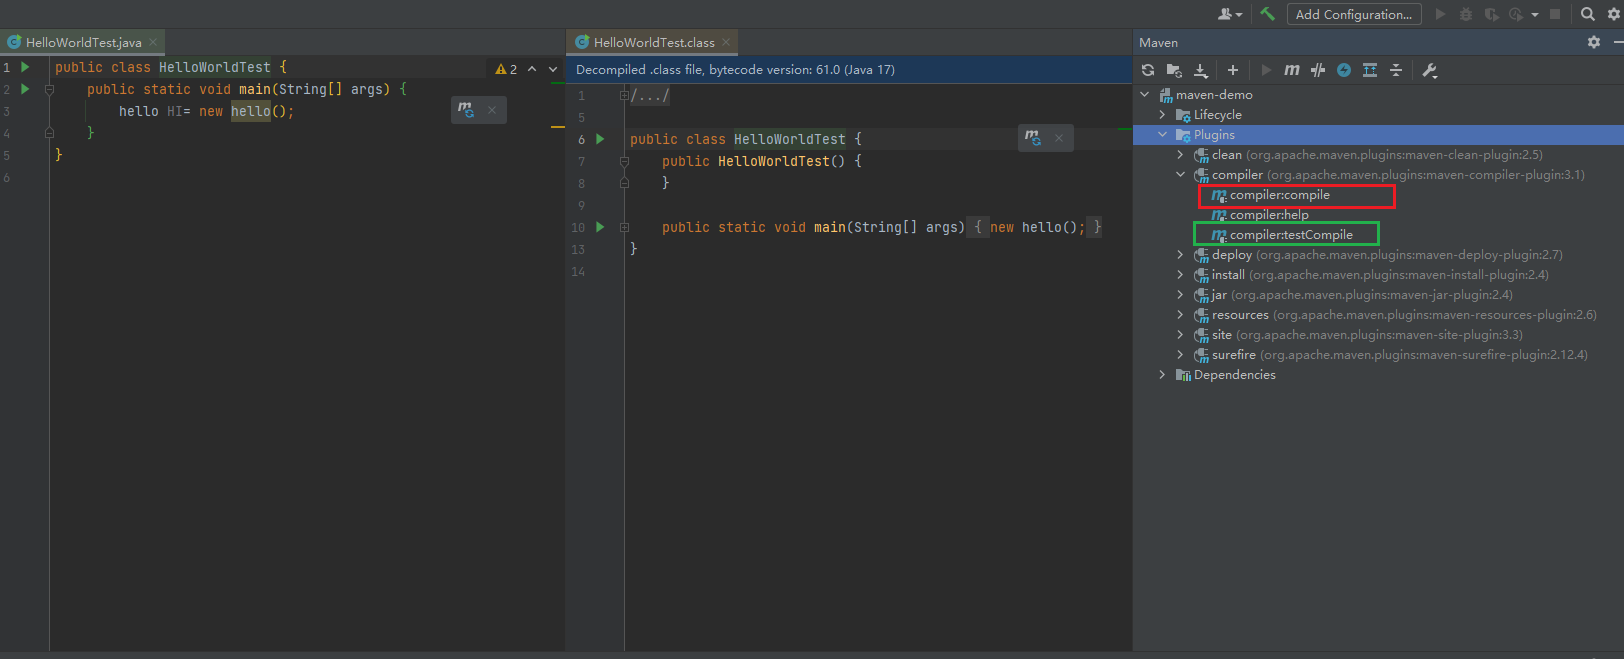
- we can add configuration to fix this problem

Maven Surefire Plugin
Runs Unit tests inside our project, also generates Test report
    <plugin>
        <groupId>org.apache.maven.plugins</groupId>
        <artifactId>maven-surefire-plugin</artifactId>
        <version>2.22.2</version>
    </plugin>
once you add the plugin to your project, you can run it in your terminal and type
mvn clean testAnd it will get you a report in your target folder.
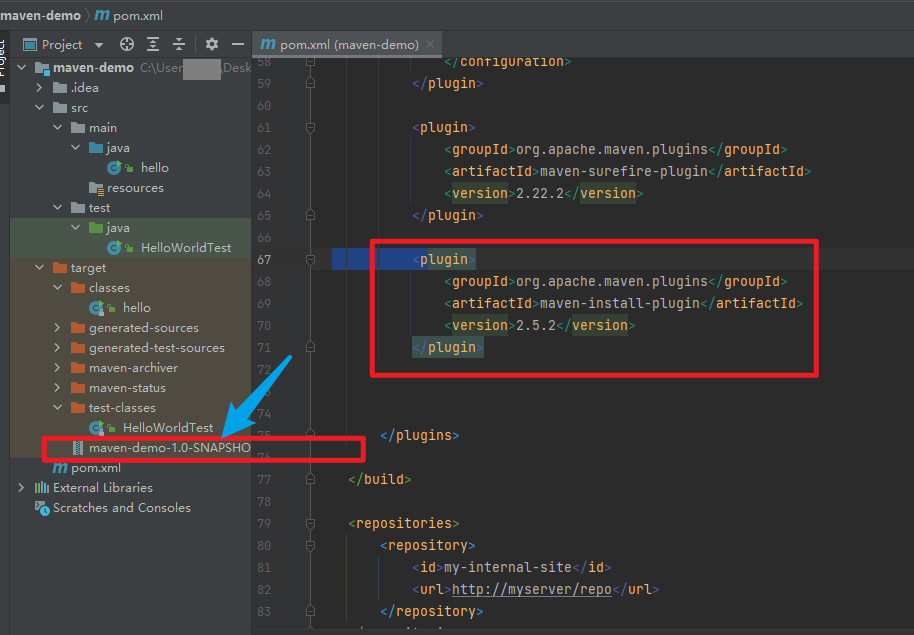
- Maven install Plugin
packages sourcen code into a artifact and installs it into the local repository
      <plugin>
            <groupId>org.apache.maven.plugins</groupId>
            <artifactId>maven-install-plugin</artifactId>
            <version>2.5.2</version>
        </plugin>
- Maven deploy Plugin
deploy the created Artifact into the remote repository
        <plugin>
            <groupId>org.apache.maven.plugins</groupId>
            <artifactId>maven-deploy-plugin</artifactId>
            <version>2.8.2</version>
        </plugin>
Maven moudule Projects
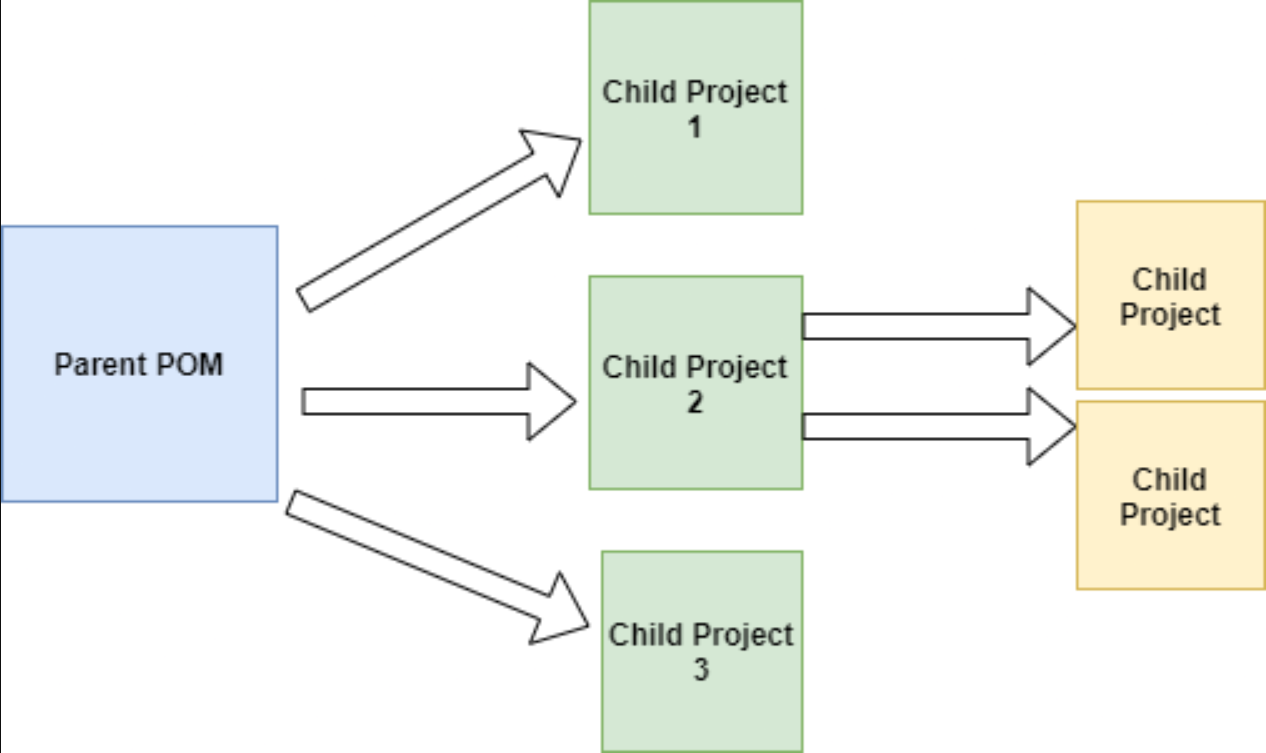
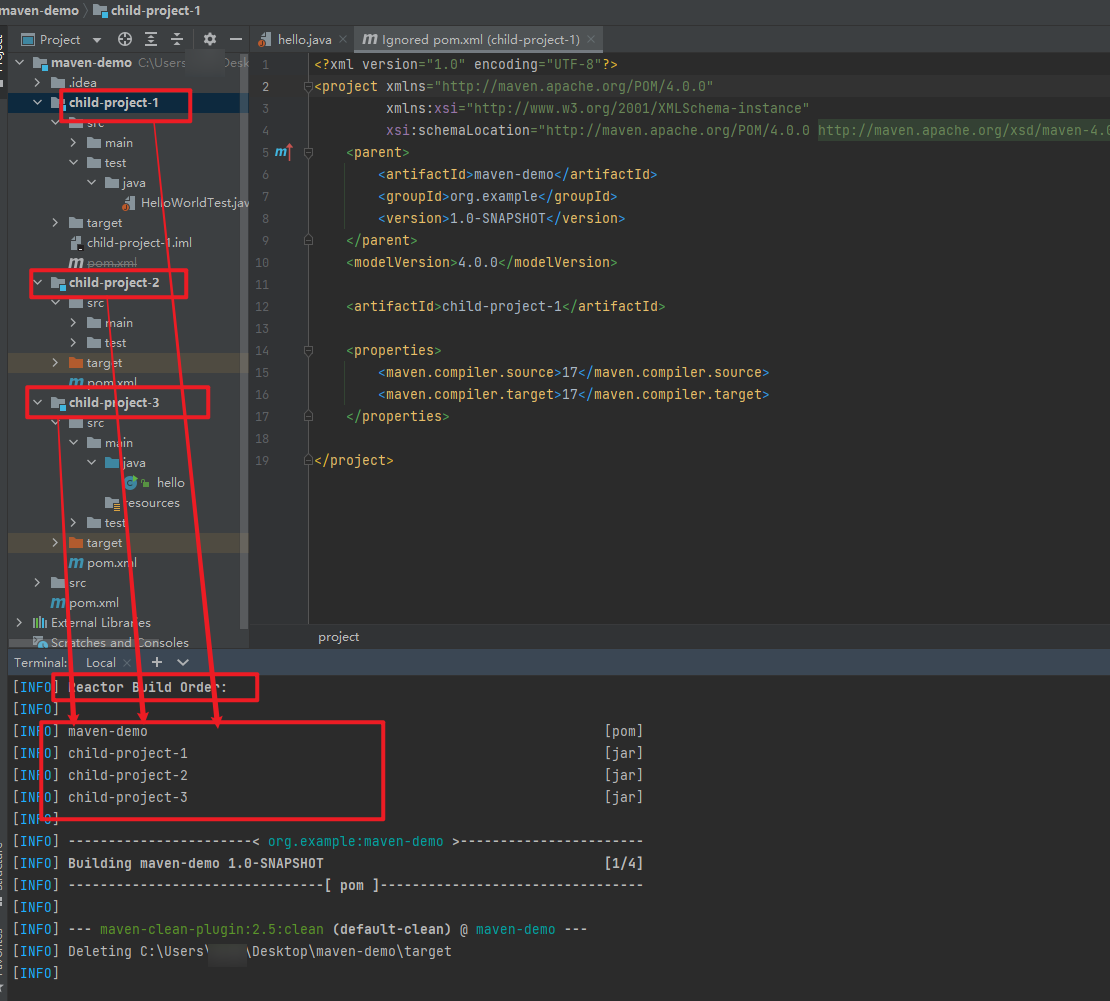
- create a new moudule
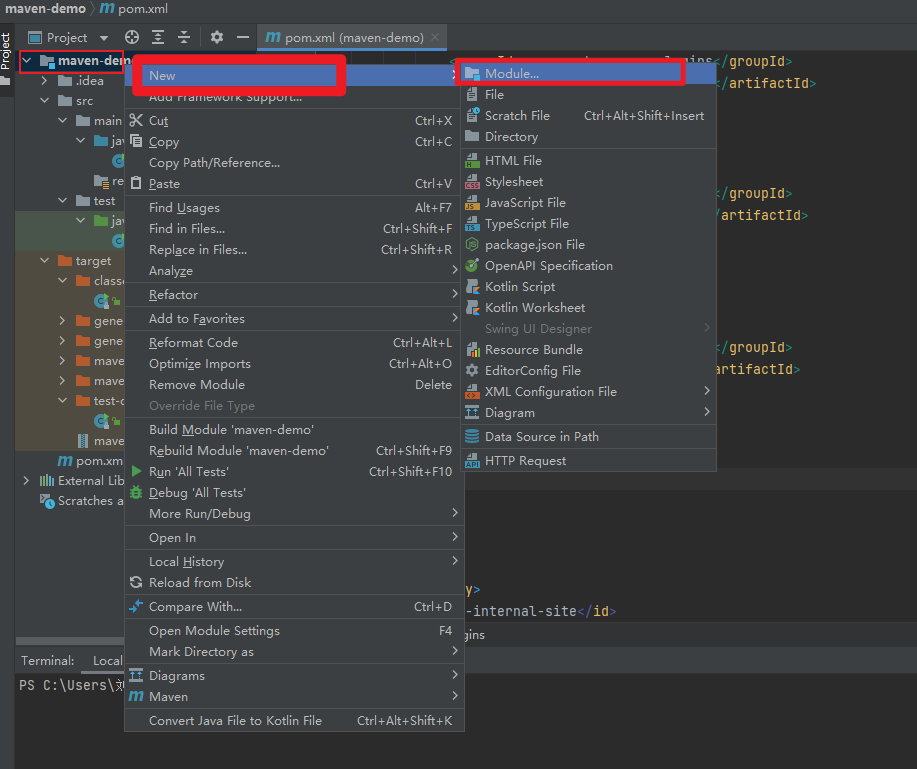
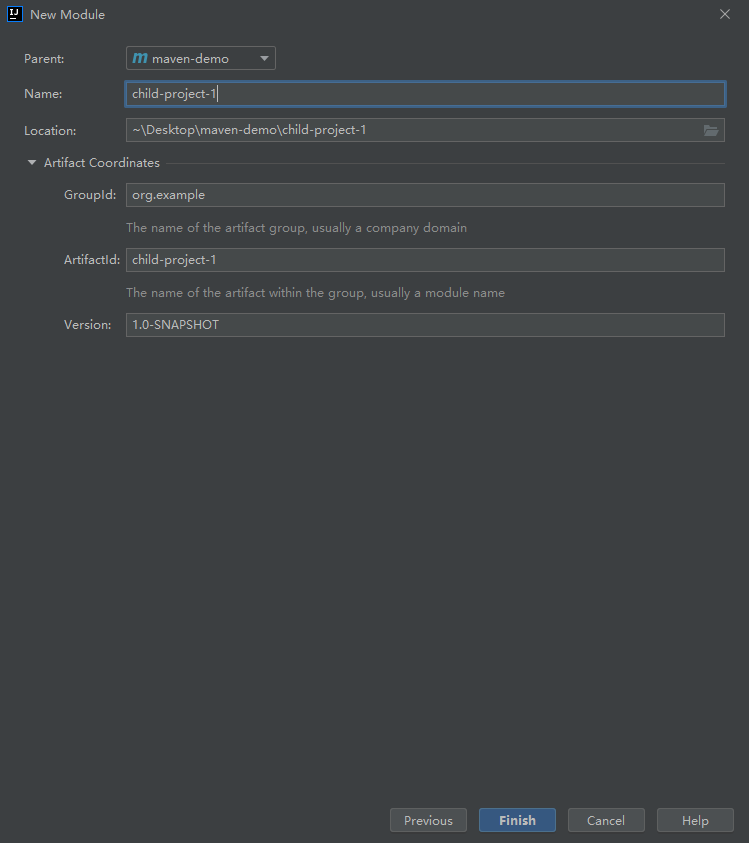
- you can see the
child-project-1added into thepom.xmlin theroot directory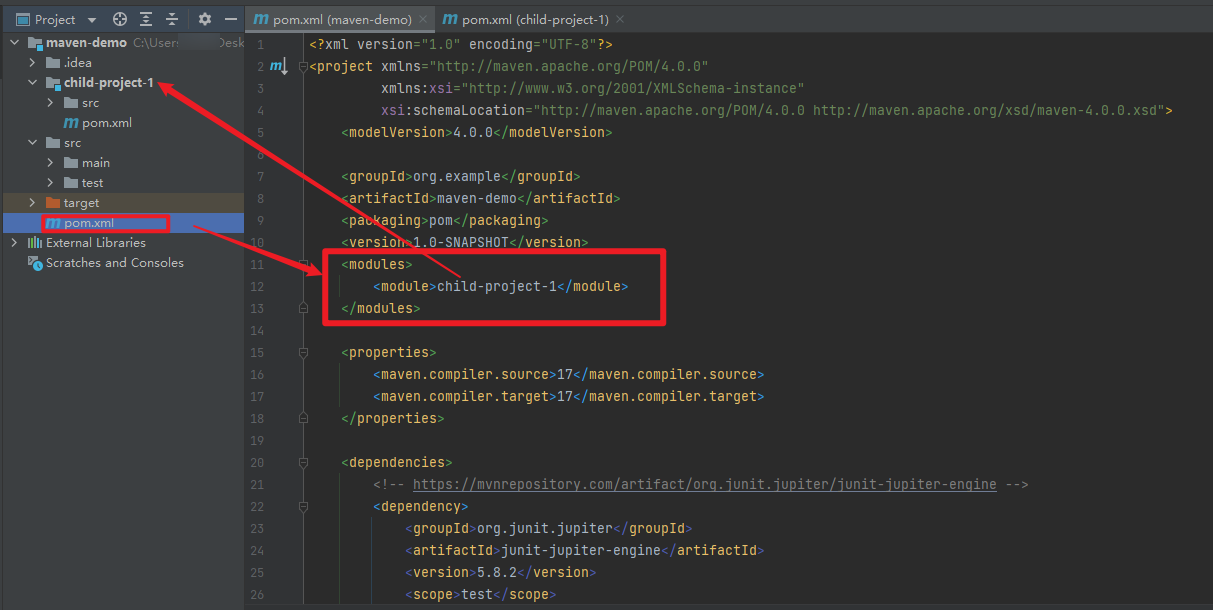
- and in the
child-project-1pom.xmladdmaven-demoasparent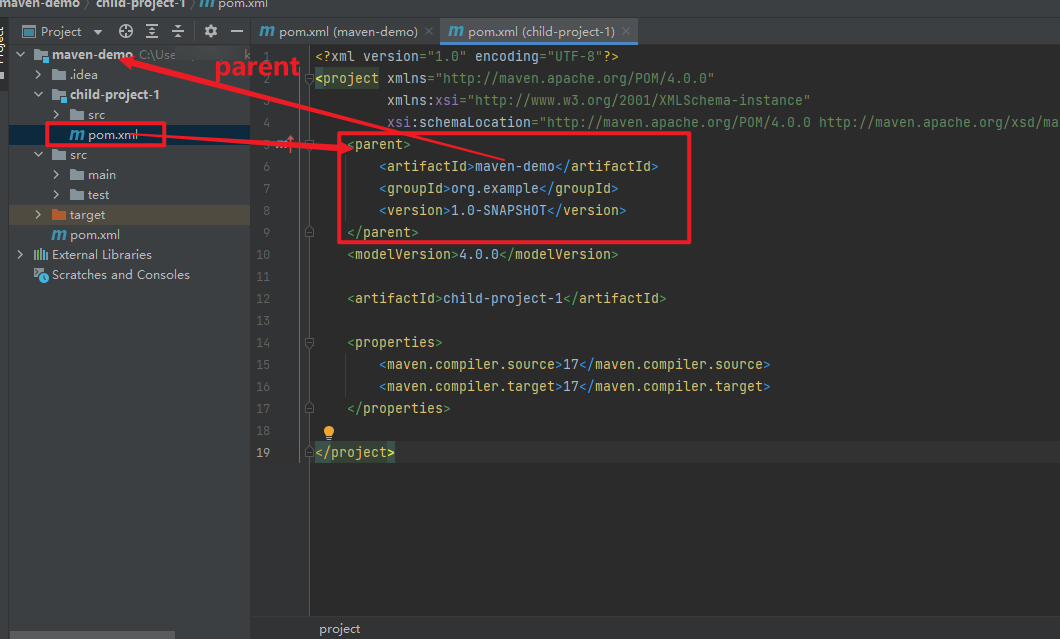
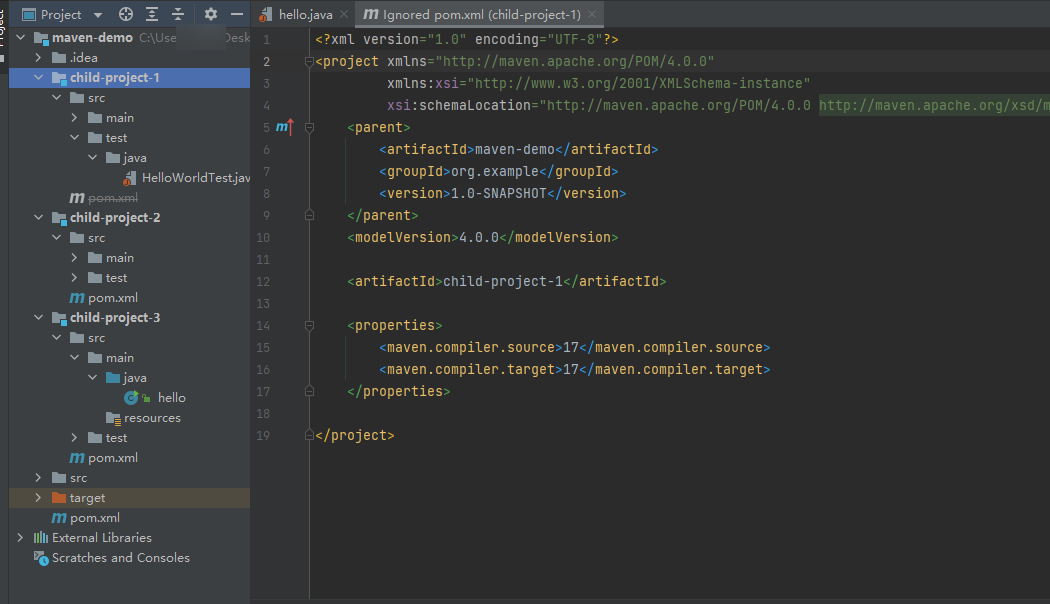
- and we can add more child projects in the project, in this case we add three child projects in the same way into the project as following.
- then we use the command
mvn clean install, and then, you can see that maven use something calledReactorautomaticlly know that there is mutiple child projects
- When you working with mutiple child projects, you may use same dependencies ,like
junitwith different version.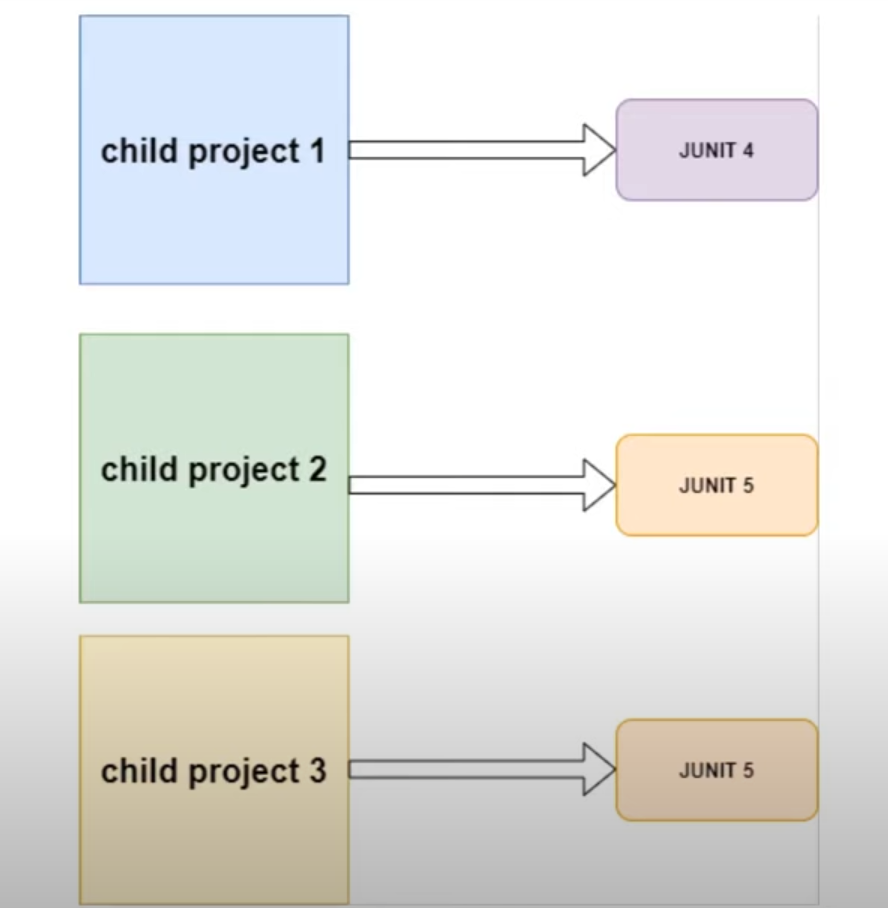
- we can use
dependencyManagementtag to manage all the dependencies. - create a
dependencyManagementtag in the rootpom.xmlfile. - and move all the
dependenciesinto thedependencyManagementtag. - what the difference between
dependencyManagementanddependencies, if we leave thecommons-langdependency outside thedependencyManagementtag, and the rest move into thedependencyManagementtag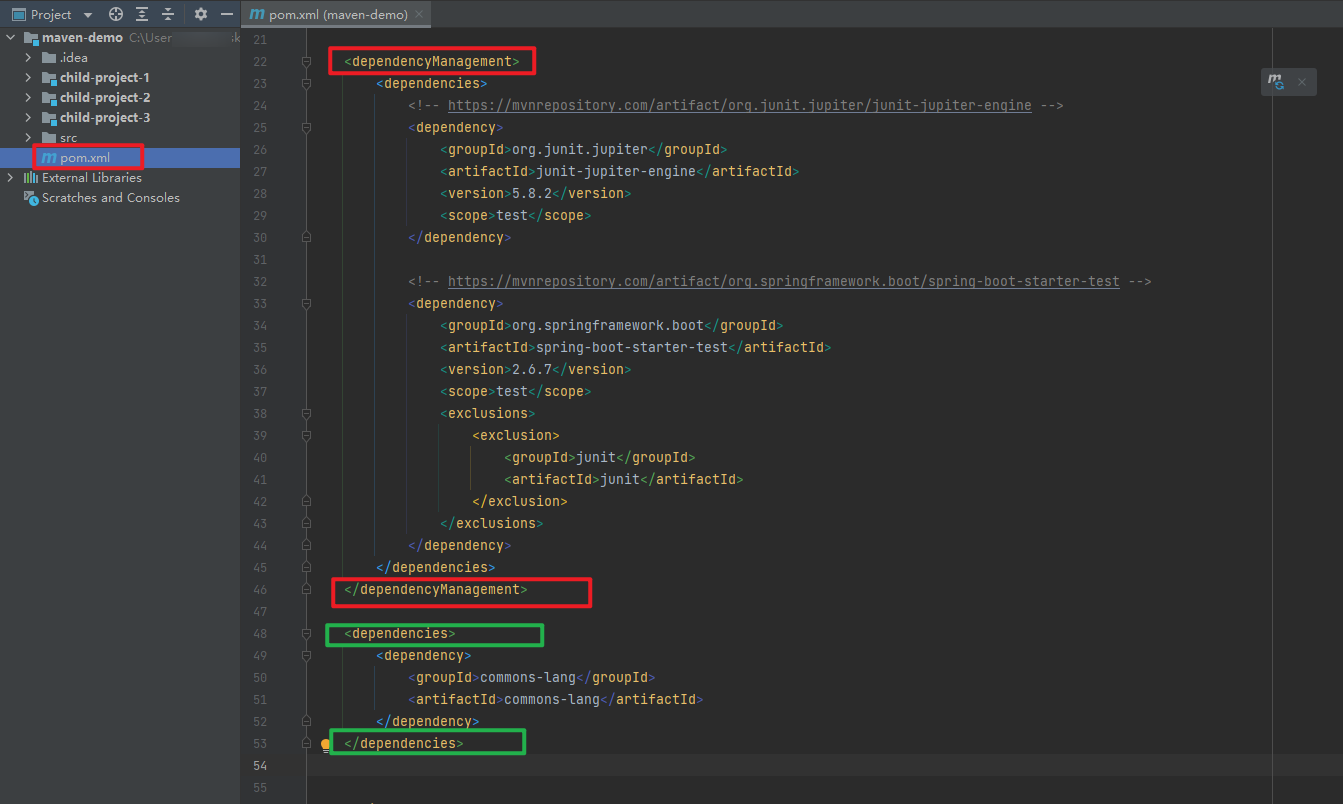
then, open the
pom.xmlfile in thechild-project-1check the dependency tree (if you don’t have a thedependency analyzeryou can search a plugin callmaven helperin the IntelliJ plugin marketplace)if i want to use the
junitdependency inchild-project-3, we have to manually adddependenciesin thechild-project-3’spom.xmlfile.
Maven profiles
customized the build process
<profiles>
<profile>
    <id>skip-test</id>
    <properties>
        <maven.test.skip>ture</maven.test.skip>
    </properties>
</profile>
</profiles>